Python tools for Windows forensics: Windows Security event log

This month’s new module for the MCAS Windows Forensic Gatherer queries the Windows Security event log to gather information on the user’s logon and logoff activities, helping us to determine exactly when they were using the system.
What is the Windows Security event log and how does it help our investigation?
The Windows Security event log is one of the logs Windows keeps by default. It can either be stored locally on a machine (as in our case) or forwarded from a group of hosts to a central server in a corporate network. It records a range of security-related events, but we’re most interested in the information regarding a user’s logon and logoff activity – specifically events 4624 and 4647.
Windows event 4624 is quite straightforward – it documents a successful logon and includes the logon username (or email address for Microsoft accounts), computer name, and logon type.
There are several different types of logoff events, but for now we’re going to focus on Windows event 4647, which signals the end of a user’s session and includes the username involved. When we add events 4624 and 4647 to our forensic timeline we’ll be able to spot patterns in the activity and determine when the subject of our investigation was using their computer.
Setting things up
As we covered in the post on the Recycle Bin module, the MCAS Windows Forensic Gatherer is now modular. Each module has its own function and is called by the main routine. By this point the routine has already defined the global variables and imported the handy win32evtlog library, so after defining the function our first step is to set those elements up so they’re ready to use.
global username
    hand = win32evtlog.OpenEventLog("localhost", "Security")
    flags = win32evtlog.EVENTLOG_BACKWARDS_READ|win32evtlog.EVENTLOG_SEQUENTIAL_READ
    total = win32evtlog.GetNumberOfEventLogRecords(hand)
    event_no = 1
    print "Accessing Windows Security event log."
We import the global variable containing the username, which we’ll search for in the logs. Then we open the Security event log from localhost and read it backwards in order. The event_no variable will be iterated and compared to the total variable to determine when our module has read all of the available security events. Finally, we print a message to the screen to keep the analyst updated on progress.
Finding the user’s logon and logoff events
Now we’ve defined the parameters for accessing the Security event log, it’s time to iterate through the events and extract any logon or logoff events involving the user we’re investigating.
while True:
        events = win32evtlog.ReadEventLog(hand, flags, 0)
        if events:
            for event in events:
                data = event.StringInserts
                if (event.EventID == 4624 and username in data[5]) or (event.EventID == 4647 and username in data):
Windows Security events are read into the events variable. If the data exists, the script then iterates through each event, importing its strings into the data variable and determining whether it contains the event ID 4624 or 4647 and the username. If these conditions are matched, we continue.
Extracting information from logon and logoff events
The next stage is to extract the necessary information so it can be appended to our forensic timeline. We’re interested in the message (whether it was a logon or logoff event), the computer used, and the username, as well as the time at which the event was recorded.
		if event.EventID == 4624:
                        message = "Logon"
                        computer = data[1]
                        user = data[5]
                    elif event.EventID == 4647:
                        message = "Logoff"
                        computer = data[2]
                        user = data[1]
First we determine which event ID we’re dealing with, since the data is located in different field numbers for each. Once it has been located, we assign it to the computer and user variables and add our own message (“logon” or “logoff”), ready to be added to our CSV file.
event_time = str(event.TimeGenerated)[3:5] + "/" + str(event.TimeGenerated)[0:2] + "/20" + str(event.TimeGenerated)[6:]
                    event_time = str(datetime.datetime.strptime(event_time, "%d/%m/%Y %H:%M:%S"))
Next we extract the event time – although this requires a little bit of reformatting to match the rest of our timeline. As with previous modules, giving the correct format to the datetime library’s strptime function allows us to convert it to a properly formatted timestamp.
Writing the results to the CSV timeline
Finally, it’s time to assemble a line for our CSV forensic timeline from the data we’ve gathered, append it, and then escape the while loop so the MCAS Forensic Gatherer can return to its main routine.
event_line = event_time + "," + message + "," + "," + "," + user + "," +  "," + "," + "," + "," + "Windows Security event log" + "," + computer + "\n"
                    timeline_csv.write(event_line)
This section is quite similar to the other modules – the strings we gathered from the event are combined with commas in the right places to create a line suitable for the CSV file, which is then appended. The timeline_sort function will sort artefacts from all modules once they’ve been gathered.
				event_no += 1
                if event_no > total:
                    print "Logon/logoff data gathered from Windows Security event log."
                    print ""
                    return
Finally, we add one to the event_no variable and check whether it now exceeds the total number of Windows Security events available. If it does, a success message is printed to the screen and the program returns to the main routine, ready to run the next module’s script and gather further artefacts.
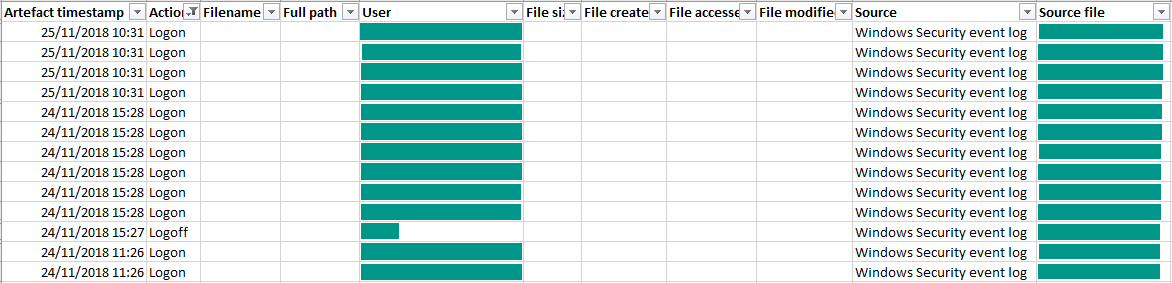
The output
Let’s check up on our CSV forensic timeline. If we filter the file to show only logon and logoff events, we can see what the new module added: events with times, usernames, and computer names.
In the interest of privacy I’ve hidden some of the information below, but you can see that the module created a series of logon and logoff lines. Each of these contained my Windows username (or the email address associated with my Microsoft account) and my computer name.
The MCAS Windows Forensic Gatherer can now parse Prefetch data, gather information on deleted files from the Recycle Bin, and find out when a user logged on and logged off from their computer. Next month, we’ll fetch the user’s Google Chrome browsing history. I’ll see you there!
Photo from Luka Siemionov on Canva