Network connections and packet crafting on the Linux command line
The problem with taking leave during a pandemic is that there are very few places you can go that don’t present an unnecessary risk. For me at least, the thought of taking a plane abroad wasn’t appealing, and neither were the Tube journeys that would be necessary to go out and about in London. To save myself from three weeks of Football Manager and repeats of The Office, I stocked up on cyber security books.
I finally completed my first runthrough of the mammoth CISSP study guide, brushed up on my PowerShell with PowerShell for Sysadmins, and took some time to improve my Wireshark skills with Practical Packet Analysis. The latter was certainly my favourite - Chris Sanders’ book serves as both a very practical exploration of packet analysis and just about the best introduction to networking fundamentals I’ve come across. It’s certainly one I’ll be recommending to my colleagues when I return to the (virtual) office.
When I finished Practical Packet Analysis, I decided I wanted to increase my familiarity not only with Wireshark and analysis techniques, but also how the packets are generated in the first place. It’s easy enough to run ping or nslookup and observe the results, but when it came to manually crafting packets I was only vaguely aware of where to start, and it seemed like a useful area to explore. So I fired up a couple of Linux virtual machines, opened Google, and got searching for tools and tutorials to help me.
Below is a brief overview of some of the tools I experimented with. Some of them allow you to create packets, others TCP connections - but all of them are worth spending some time with to send some packets, generate some PCAPs, and learn more about how your network functions.
Contents
1. netcat
2. Bash
3. Scapy
4. SendIp
netcat
Let’s start with a classic. A favourite among cyber security professionals, netcat is a tool that can be used to send and receive data between systems, either via TCP or via UDP with the -u flag. A listener is set up using the -l flag - for example, the command below would start a listener on UDP port 372.
sudo nc -lu 372With this system listening for UDP datagrams on port 372, we can now use netcat to send data from a second system. The command to begin sending data is quite similar to the one for setting up the listener - just this time we remove the -l flag and specify the IP address we want to transmit the data to.
sudo nc -u 192.168.234.128 372Any text that is sent over the new connection is displayed almost immediately in the terminal of the receiving machine, which is fine if you’re sitting watching the Linux terminal and waiting for quite a short message, as in the example communication between the two VMs below.

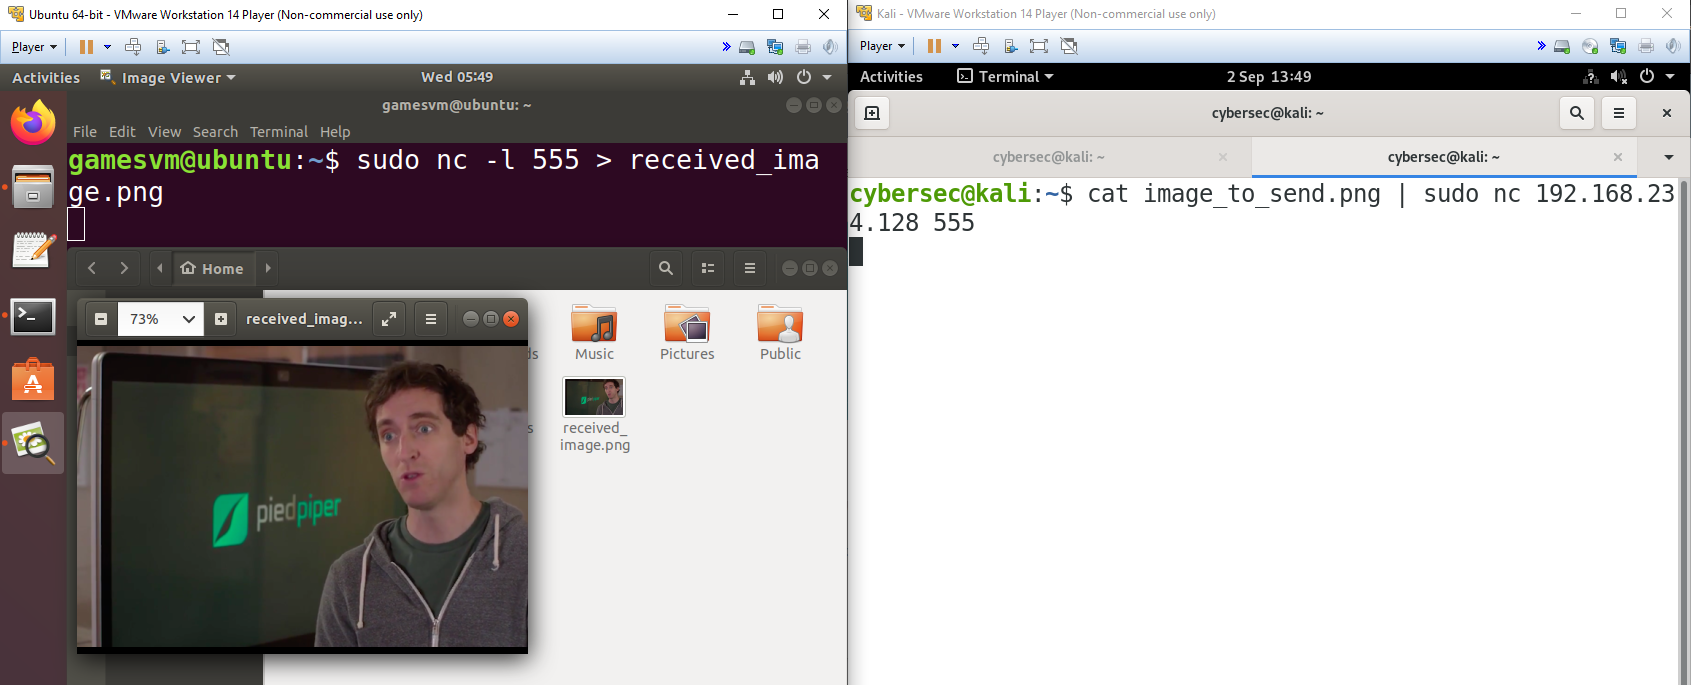
The beauty of Linux, however, is that we can easily chain together commands to achieve more than they could individually. Let’s say we want to send an image file via netcat, for example. We can use > and | to read the contents of the file on the sending machine and save it on the receiving machine. To receive the image via a TCP connection on port 555, the recipient would use the following command.
sudo nc -l 555 > received_image.pngThe sender would do almost the exact opposite, piping the contents of the original image file to the netcat connection in order to transmit it over the network to the recipient’s system.
cat image_to_send.png | sudo nc 192.168.234.128 555cat reads the contents of the image file, which are piped to our netcat connection. The receiving system sends the data received over the connection to its own image file, and when we check the file itself via the GUI we can see that the image data was successfully transmitted and saved to disk.
These examples only scratch the surface of what is possible with netcat, and I’d encourage you to play around with it to see what it is capable of. SANS has a particularly handy cheat sheet with common commands and accepted flags and options to help you get started.
Bash
While we’re on the topic of sending messages and files over the network, it’s also worth noting that the Linux Bash terminal actually has a built-in capability for this using /dev/tcp/ and /dev/udp/. Simply add an IP address and port and send your data to this directory, and Linux will handle the rest.
echo "Hello. I'm sending this from the Linux terminal." > /dev/tcp/192.168.234.128/824In this example, I’ve used echo to send a text message over the network, but I could equally have used cat and a filename to send a file like we did with netcat. A netcat listener on the recipient’s system receives the message and outputs it to the terminal as in our first netcat example.

Did you notice the small difference in the output above? When all the data has been received, the TCP connection is closed and the listener stops. If we were expecting to receive more data later, we could use netcat’s -k flag, which would keep the listener active. The TCP connection is still closed when the transfer is complete, but the listener persists and allows the creation of additional TCP connections as they are needed in response to connection requests from clients.
Another difference to using netcat to send data was that we did not need to use sudo to send data from a TCP port using /dev/tcp/ - useful to know for scenarios where there are restrictions in place.
Scapy
Now let’s move down a level and take a look at some tools for manually crafting packets. Scapy is a Python tool that allows you to send custom packets, individually manipulating fields and flags via a series of commands and options to send exactly the data you want - very useful for testing.
Let’s say I want to check my Pi-hole DNS server is functioning correctly and returning responses when it receives queries. I can manually craft a DNS request for my domain, www.mattcasmith.net, using the following command within Scapy to specify fields like the destination address/port and DNS query.
(dst="{pihole_ip}")/UDP(dport=53)/DNS(rd=1,qd=DNSQR(qname="www.mattcasmith.net")),verbose=0)I specify the Pi-hole’s IP address and the UDP port 53 (used for DNS) as the destination, and provide the domain to be queried with the qname parameter. If all goes well, Scapy will send the packet to the DNS server and print the packet it receives in response, as below. If we wanted to review this data in a nicer format, we could also have run Wireshark or tcpdump at the same time to generate a PCAP.
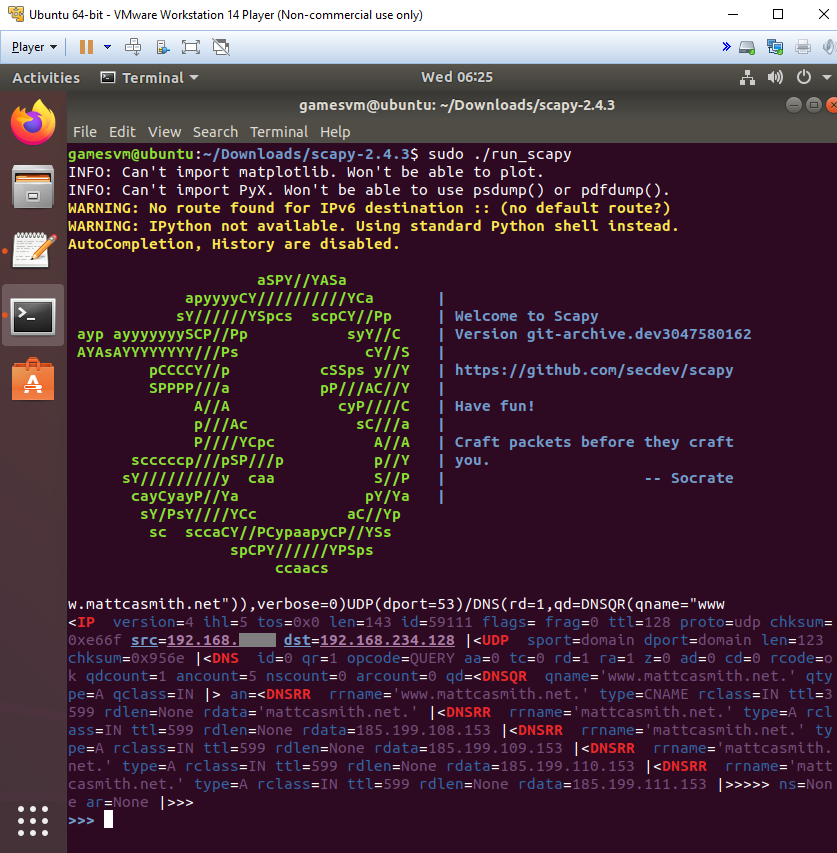
By reviewing the response above, we can see that the Pi-hole has successfully returned a response. Between the DNSRR tags we can see that the DNS server has returned several IP addresses associated with the domain, as we’d see in the output of a tool like nslookup or dig.
SendIp
Another means to the same end is SendIp - a Linux command line tool that enables you to craft custom packets in a similar way to Scapy. Rather than sending another DNS query, let’s go back to an earlier example and set up a netcat listener on UDP port 904 to receive a text message.
sudo sendip -p ipv4 -is 192.168.234.130 -p udp -us 5070 -ud 904 -d "This is a datagram sent with sendip from the command line." -v 192.168.234.128The length of the SendIp command reflects the additional flexibility we have compared to when we sent a similar message with netcat. The -p flag sets our protocols - in this case IPv4 at the network layer and UDP at the transport layer - and after each we specify the contents of various header fields.
Notice that SendIP allows us to set the IP source address manually with -is as well as the UDP source port with -us. In testing scenarios, including penetration tests, this would allow us to spoof packets from different machines, with much greater control over the packet and header contents than with netcat.
Finally, the -d flag declares the contents of the packet payload - in this case the text message, which we can see in the output on the recipient’s system is received by the netcat listener.

All of the tools and examples above represent different ways of sending data over a network from the Linux command line. While I used simple text and file exchanges to demonstrate how they work, these tools have many different features and options and can be used in much more complex scenarios. Hopefully this post has given you some idea of how they work and what they are capable of, and given you enough of a starting point to try some experiments of your own.