Using Tkinter to build simple GUIs for Python apps
I’ve written many Python scripts and apps in the past, including my Windows backup utility Backutil, which is probably the my most complex project to date. But I’ve always designed these to run in the background or on the command line, and haven’t ever tried to build an app with a graphical user interface (GUI).
I was recently studying for a few cyber security certifications and realised it would be useful to have an app for displaying flashcards. There are probably a million solutions for this online already, but I thought it would be a good opportunity to learn how to add a GUI to control some simple Python functions. So I took to Google, looked up some tutorials, and cobbled something together on a Saturday afternoon.
I’ll share the full code in future via GitHub and another blog post (there are still some more features I want to add), but for now I’ll focus on the GUI-related elements and how they connect to everything else.
Introducting Tkinter
Tkinter is a Python library that allows you to work with the Tcl/Tk GUI toolkit to create applications that will work across Windows, macOS, and Linux. You can visit the link to review the full documentation, but I’ll cover some of the basics I learnt and how I used them for my flashcards app in this post.
As with any Python extension, the first step is to import the library.
from tkinter import *
from tkinter import ttk
To understand what comes next, it’s probably better to see what the end result looks like first, so here’s the very simple GUI that we’ll be constructing in the following code segments for the flashcards app.
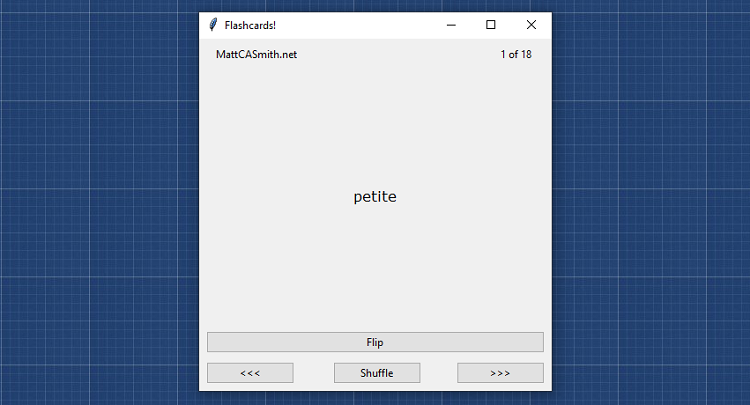
As you can see, we have a main area that displays the content of the current flashcard, a button to flip the card to the other side, previous/next buttons and a counter to show the current position, and a button to reshuffle the deck into a new random order. There are also some keyboard shortcuts so the user doesn’t always need to navigate with the mouse. In the following sections, I’ll go over how each of these work.
Setting up the window and grid
We need a canvas before we can do any painting, and in this case the canvas is the application’s main window - also known as root. We can set this up with a few simple lines of code.
root = Tk()
root.title("Flashcards!")
root.geometry("400x400")
You can probably already glean the basics just by reading this, but with title we have set the window title to Flashcards!, and with geometry we have set the default window size to 400 by 400 pixels.
Before we can place individual elements in our window, we need to establish a grid, which we’ll call mainframe. The following lines create this frame and centre it with the compass-point sticky attributes.
mainframe = ttk.Frame(root, width=400, height=400)
mainframe.grid(column=0, row=0, sticky=(N, W, E, S))
With the grid itself set up, we can now apply attributes to the individual rows and columns. My basic GUI will require four rows, but only one of them needs any special configuration. I’m using weight and minsize on the second row to reserve plenty of space for the content of the cards.
mainframe.rowconfigure(1, weight=8, minsize=295)And that’s our grid set up and formatted! To help you to visualise where we’re adding each button and label in the next section, here’s roughly how the grid aligns to the finished GUI.
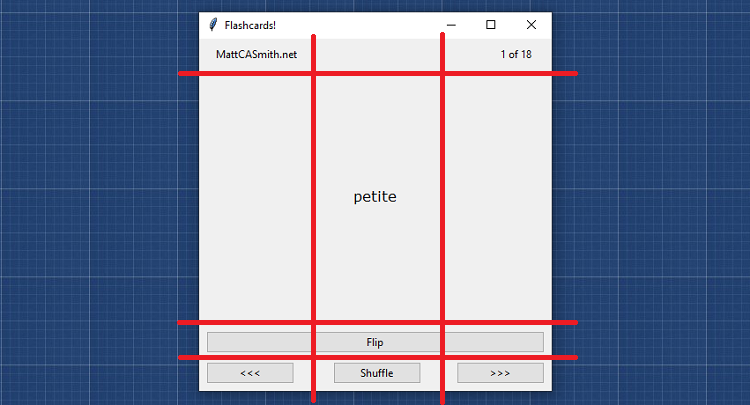
Notice how the tweaks we made to the second row ensure there’s plenty of space in the middle in case the user provides lengthy content for their flashcards. You’ll probably also spot that the main card content and the Flip button don’t respect the column layout - we’ll see how to achieve this in a moment.
Buttons, labels, and string variables
Now we can get to placing the window contents - but we still have one more important job to do first. The text in the main card content section and the counter in the top right will need to change based on the user’s input, and to be able to update them we must establish them as StringVar() variables.
card_content = StringVar()
card_number = StringVar()
Then we create each button and label individually and assign their attributes.
ttk.Button(mainframe, text="Flip", command=flip_card).grid(column=1, row=2, columnspan=3, sticky=(W,E,S))
ttk.Button(mainframe, text="<<<", command=prev_card, width=15).grid(column=1, row=3, sticky=(W,S))
ttk.Button(mainframe, text="Shuffle", command=randomise_data, width=15).grid(column=2, row=3, sticky=S)
ttk.Button(mainframe, text=">>>", command=next_card, width=15).grid(column=3, row=3, sticky=(E,S))
ttk.Label(mainframe, font="Verdana", textvariable=card_content, wraplength=390, anchor="center", width=38).grid(column=1, row=1, columnspan=3)
ttk.Label(mainframe, textvariable=card_number, anchor="e", width=15).grid(column=3, row=0)
ttk.Label(mainframe, text="MattCASmith.net", anchor="w", width=17).grid(column=1, row=0)
In the brackets after each Button or Label is created, we first state which element it should be placed within (mainframe) and then provide various configurations. There are three that are worth explaining:
-
textvariable- used to assign the twoStringVar()variables we established to their respective labels. This is necessary for dynamic text. If the text is static,textcan be used instead -
anchor- sets the alignment of the label text based on compass point values -
command- links buttons to the Python functions that must be executed when they are clicked. For example, clicking the Shuffle button will execute therandomise_datafunction
In the brackets after grid we establish the placement of each element in the grid we set up earlier. The column and row numbers assign a cell to the element, and sticky sets its alignment within that cell. An interesting attribute here is columnspan, which allows an element to sit across multiple columns - as is the case here with the main content and the Shuffle button.
Keyboard shortcuts
With our GUI mostly in place, we have an issue. When revising using a flashcards app, you’d want to be able to cycle quickly between the cards and flip them instantly to see whether you’re right or wrong. But at the moment our user needs to click on the corresponding buttons each time they want to change the view. So let’s fix that with some keyboard shortcuts so they can study at speed.
root.bind('<Left>', prev_card)
root.bind('<Right>', next_card)
root.bind('<Return>', flip_card)
This should be fairly self-explanatory, but essentially what each line achieves is to bind a Python function (prev_card, next_card, flip_card) to a key (the left and right arrows and return, respectively), reducing the work required to cycle through cards and providing a much smoother user experience.
Drawing the window
There’s just a little more admin to do before our application will run properly. Firstly, let’s add some padding to each cell in the grid to space out our buttons and labels a little.
for child in mainframe.winfo_children():
    child.grid_configure(padx=5, pady=5)
Finally, we use mainloop() to run our application and draw the window. When execution reaches this line, the window will be drawn and the app will essentially sit idle awaiting user input, so it’s important this we did the necessary legwork beforehand to make sure everything is in place and presentable.
root.mainloop()And there you have it - this code (and the functions required to provide the actual functionality) should be all you need to create a very simple GUI application using Python. Flashcards! is currently at the minimum viable product stage - it’s perfectly usable as a study tool, but still rough round the edges. Once I’ve had a chance to spruce it up a bit I’ll be sure to share the full project code. Watch this space!